|
|
|
|
|
|
|
A Digital Audio Restoration Primer |
|
The following discussion of digital audio restoration makes for a VERY long page. To facilitate moving around the page just click on the link to go directly to that section of the primer. |
|
INTRODUCTION This section provides an overview of digital audio restoration to help anyone who may want to have a phonograph record or tape restored understand what is involved and what to look for in selecting a digital audio restoration service. It will also serve as a starting point for someone who may want to digitally restore his own record or tape collection. Digital audio restoration is the process of transferring an analog audio source like a phonograph record or a reel-to-reel tape to a digital format and then removing unwanted noise while preserving the sound that is then archived in a digital format -- usually as an audio CD or a data CD containing mpg-3 or WMA audio files. RECORD EQUALIZATION You begin with a source (a record, tape or cassette) and something to play the source on. In the case of a record, the requirements are a turntable, tone arm, phono cartridge, stylus, preamplifier and a means of properly equalizing the record. Since approximately 1955, most long play records have been recorded with the RIAA equalization curve. A complimentary equalization curve must be applied to compensate for the equalization that was applied when the record was cut. You will probably use a magnetic phono cartridge. The output of a magnetic cartridge is so low that it requires a preamplifier to bring up the level to the point that it can be used by a computer sound card. Until the early 1980's, most hi-fi/stereo preamplifiers and receivers included a phono input that provided the necessary gain and equalization to play records using the RIAA curve. If you have a preamplifier or receiver with the proper input, you can use it to play the records. Or you can use an external phono preamplifier. Additionally it is possible to equalize the sound using a software equalizer plug-in. More about this later. If you are dealing with LP's made prior to 1955 or with 78 rpm records or with 16 inch electrical transcriptions, you will need to apply a different equalization curve. There are hardware preamplifiers available that provide the various combinations of settings for the rollover and turnover for different kinds of records. Again, it is also possible to create the necessary equalization curves using software equalization plug-ins. 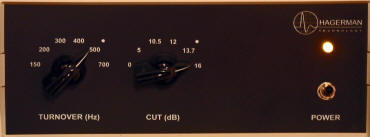 In addition to the Hagerman phono preamp shown on the right, I have two custom built preamps that allow the selection of either RIAA equalization or no equalization at all. This permits the option of playing a record without equalization and then creating equalization curves using software. TURNTABLES BACK TO TOP OF PAGE Not all turntables are created equal. There are consumer turntables and broadcast turntables (There are also very expensive esoteric audiophile turntables). Broadcast turntables tend to be big and bulky and built like tanks and hold up under heavy use but to have mediocre wow and flutter and rumble specifications in comparison with their consumer counterparts. Consumer turntables tend to have better wow and flutter and rumble specifications but lack the quick start and high torque features of broadcast turntables and are not as well built and as a consequence may require more upkeep and maintenance. Turntables vary as to how the motor drives the turntable. Many of the less expensive ones used an idler wheel that transferred power to the rim of the turntable. Because of this feature records played on them often had increased rumble noise at the beginning of a record that tended to lessen as the stylus moved further away from the outside rim of the turntable. The last broadcast turntables sold under the Gates name used a variation of this technique that used an idler wheel that contacted a specially designed inner rim of the turntable that was supposed to reduce rumble. Another popular way of transferring power from the motor to the turntable uses a belt drive. The advantage is that the belt tends to absorb the vibration transmitted by the motor shaft and pulley. As a result, the rumble specification for belt driven turntables tends to be less than that of rim driven turntables. The downside is that the overall torque is often less than other methods and as the belts wear the torque continues to drop until the arrangement will cease to work altogether unless the belt is replaced. Finding replacement belts for older turntables can be difficult and sometimes impossible. Beginning in the late 60's, a new kind of turntable began to appear: Direct Drive. These turntables used a complicated electronic servo system that allowed the motor's shaft to become the record spindle with the turntable attached directly to the spindle. Many consumer direct drive turntables were woefully underpowered and they were slow to reach full speed and the weight of the stylus on the record was often sufficient to cause slight variations in the speed. However, companies like Panasonic developed a professional series of direct drive turntables. Panasonic's turntables were marketed under the Technics name and these proved to be exceedingly high quality turntables with high torque that achieved full speed in about one third of a revolution and that had rumble, wow and flutter specifications that were often lower than the very best mastering lathes. I have three different Technics series direct drive professional turntables.  The
early Technics direct drive turntables were crammed with all kinds
of discrete components including transistors, resistors, capacitors,
chokes, etc. Because of this they are very hard to service. I had
one SP10-MKII that was sent out for repair twice and each time it
came back malfunctioning. Eventually I gave up on trying to have it
repaired. The later models incorporated more integrated circuits and
tend to be less difficult to repair. If you do acquire a direct
drive turntable I recommend that you also obtain a repair manual for
it The
early Technics direct drive turntables were crammed with all kinds
of discrete components including transistors, resistors, capacitors,
chokes, etc. Because of this they are very hard to service. I had
one SP10-MKII that was sent out for repair twice and each time it
came back malfunctioning. Eventually I gave up on trying to have it
repaired. The later models incorporated more integrated circuits and
tend to be less difficult to repair. If you do acquire a direct
drive turntable I recommend that you also obtain a repair manual for
itTONE ARMS BACK TO TOP OF PAGE In most cases, consumer turntables come complete with a tone arm. These tone arms are usually limited to playing records a maximum of 12 inches in diameter. However, beginning in 1931 broadcasters began using electrical transcriptions (phonograph records) that were as large as 16 inches in diameter. Until the early 50's these used a standard width groove (3.0 mil) which was essentially the same width as a 78 rpm record groove (Okay, not always and not exactly as by the late 1940's 2.5 mil styli were increasingly being used to play ET's). The discs played at 33 1/3 inches per second and could hold a maximum of 15 minutes of material on one side. By the late 1950's most ET's changed to a microgroove width (1.0 mil) groove and that increased the playing time to 30 minutes per side. With the advent of stereo and even closer groove spacing, eventually the 16 inch ET became obsolete as 12 inch LP's could contain up to 30 minutes of mono material one one side. To play 16 inch ET's you need a tone arm that will accommodate a 16 inch transcription. You DON'T need a turntable that is 16 inches in diameter. In fact in most cases you are better off with a 12 inch diameter platter. Why? Because nearly all broadcast 16 inch turntables have mediocre specifications. The photo that I have included above shows a 12 inch Technics SP10-MKII turntable with an SME 3012 tone arm playing a 16 inch record. A 12 inch turntable will support almost any 16 inch ET. Admittedly in the 1960's some of the vinyl became so thin and the discs so floppy that they may require that an additional 16 inch ET be placed under it for support. I have a 16 inch aluminum substrate salvaged from an old 16 inch lacquer with felt glued to one side that I use for such situations. Just as it is advisable NOT to use a traditional broadcast turntable for transferring 16 inch ET's, it is better not to use most of the 16 inch capacity tone arms that were used by broadcasters in the 40's, 50's and 60's. Tone arms such as those made by Gray are a real classic, but they are heavy and have poor lateral movement when compared with modern tone arms. If you try to put a contemporary stereo phono cartridge in such an arm, it will require re-wiring to accommodate the stereo leads and it is unlikely that the arm will track at a weight low enough to accommodate the cartridge specifications. Even if it does, the higher lateral friction could cause wear on the record groove walls. My personal preference is for the SME 3012-R tone arm. It is still available from the SME company in England but is pricey. Expect to pay $1,000 or more for a new one. Sometimes it is possible to purchase used models on the internet but because they 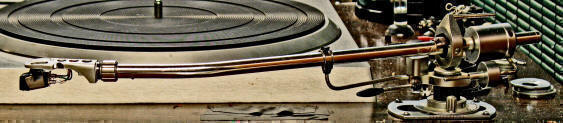 are
fairly rare the bid price is often close to the price of a new tone
arm. There are other 16 inch tone arms including a model made by
Grace. In the 60's Micro-Trak made a 16 inch model constructed of a
thin wood lamination that is capable of accommodating the tracking
requirements of many modern cartridges. It lacks any anti-skating
provision to deal with the effect of centrifugal force which can
increase the tendency of a stylus to press against the inside groove
wall. are
fairly rare the bid price is often close to the price of a new tone
arm. There are other 16 inch tone arms including a model made by
Grace. In the 60's Micro-Trak made a 16 inch model constructed of a
thin wood lamination that is capable of accommodating the tracking
requirements of many modern cartridges. It lacks any anti-skating
provision to deal with the effect of centrifugal force which can
increase the tendency of a stylus to press against the inside groove
wall.PHONO CARTRIDGES BACK TO TOP OF PAGE If you are just concerned with transferring LP's, there are a myriad of phono cartridges to choose from. But if you will be transferring 78's or ET's, you will need a cartridge for which a variety of styli diameter tips are still being made. There are three such cartridges that I am aware of: the Shure M44, the Shure SC35 and the Stanton 500/AL. My personal preference is for the Stanton. Until a few years ago when the Stanton company was sold, Stanton had a good variety of specially cut styli available for the 500. As of this writing Stanton no longer makes specialty styli. PHONO STYLI BACK TO TOP OF PAGE The Expert Stylus Company in Surrey, England, still makes custom styli for the three cartridges mentioned above. Several dealers in the United States carry some of their line of styli. If you will be transferring anything other than LP's, you should have a variety of styli diameter and shapes. Most records that you will be transferring have been played before and almost certainly will have some damage caused by worn styli, too heavy a weight, etc. With styli of different diameter and shape, it is often possible to find a spot on the groove wall below the damage where you can play the record while greatly reducing the noise caused by the groove damage. The diameter of mono styli varies from 1.0 mil to 5.0 mil. There are two basic tip shapes: conical and elliptical. Both versions are usually truncated which essentially means that the tip has been flattened. There are those who claim that playing a record with the wrong diameter stylus will damage it. However, there are really only two ways that playing a record will damage it: 1. Using a worn stylus which will behave like a chisel and cut into the groove and 2. Using too heavy a weight on the tone arm. If you use too large a stylus, the stylus will probably skip across the record since it is riding too high to maintain contact with the groove. If you use too small a stylus (like a stereo stylus on a 1940's ET), the groove noise will increase while the sound itself will decrease because the tip of the stylus will ride on the very bottom of the groove where there is little or no lateral movement to reproduce the recorded sound. CLEANING RECORDS BACK TO TOP OF PAGE There are many reasons for cleaning records -- even if the record is in a sealed album and has never been played. A new record still has manufacturing oils embedded in the surface and they should be removed. Older albums have often 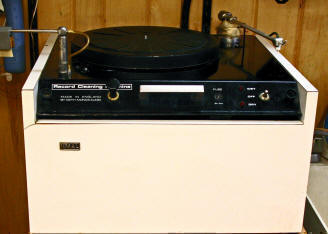 been
abused and have all kinds of dirt and grime embedded in the grooves.
Removing the dirt will greatly reduce the noise without having to
apply a single digital restoration tool. Lacquers have a particular
problem of their own: palmitic acid accumulation that looks like a
white powder on the surface of the record. It can be very difficult
to remove but will yield to repeated cleaning. been
abused and have all kinds of dirt and grime embedded in the grooves.
Removing the dirt will greatly reduce the noise without having to
apply a single digital restoration tool. Lacquers have a particular
problem of their own: palmitic acid accumulation that looks like a
white powder on the surface of the record. It can be very difficult
to remove but will yield to repeated cleaning.There are a number of different model record cleaning machines available. I use a Keith Monks record cleaning machine that is made in England. For a cleaning solution, I use a solution prepared by the "Disc Doctor." It is a formulation that has a good track record for removing dirt without harming the record. It works equally well on pressed vinyl, 78's and lacquers. The Disc Doctor also sells cleaning "brushes" that you can use to manually clean your records without the need of a record cleaning machine. You can make your own cleaning solution IF you know what you are doing. TAPE RECORDERS BACK TO TOP OF PAGE A lot of audio is archived on reel-to-reel audio tapes and that requires a tape recorder. In one sense, tape recorders are a lot simpler than record players where you need to consider several individual items including the turntable itself, tone arm, cartridge, stylus and an equalized preamp. Tape recorders come as a complete package with everything that you need. Nevertheless there are considerations. Speed for example. A tape may be recorded at 15/32 ips, 1 7/8 ips, 3 3/4 ips, 7 1/2 ips, 15 ips or 30 ips. Reels of tape came in sizes from 3 inches all the way up to 14 inches. The width of the tape is another consideration. Consumer recorders and many broadcast recorders used 1/4 inch wide tape. Mastering recording studios used tape up to 2 inches in width. Another consideration is the mechanical construction of the tape recorder. Most consumer models and some audiophile models used mechanical linkages to connect the various operating controls to the assemblies that actually caused the reels to play, rewind and fastforward. Better audiophile and most broadcast recorders used solenoid links and the controls themselves simply activated the appropriate solenoids which in turn activated the play, rewind and fastforward functions. The latter were more reliable, easier to service and machines so equipped last longer. Turntables are relatively simple devices (direct drive turntables being the exception) in comparison to tape recorders. They have a lot of moving parts (belts, pulleys, capstans, etc.) and these wear our and/or need adjustment. The tape heads themselves wear and the azimuth needs to be adjusted on a regular basis and that requires special test tapes and test equipment and the knowledge to use them. In some cases it is necessary to adjust the azimuth of the tape head to accommodate a tape that was recorded on a poorly adjusted machine. Finding replacement parts for tape recorders is an ever increasing problem. 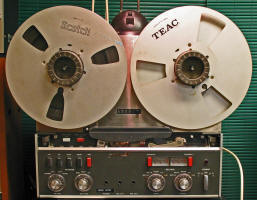 The
tape itself is also a consideration. Tape recording archives sound
by rearranging the magnetic properties of the recording tape to
correspond to the variations in sound. Because there are magnetic
fields of various intensity virtually everywhere, that makes the
tape susceptible to loss of high frequencies and even of the entire
sound as it encounters magnetic fields. Even the playback head
itself can induce minute amounts of residual magnetism on to a tape
that over a period of time can reduce the high frequency content. The
tape itself is also a consideration. Tape recording archives sound
by rearranging the magnetic properties of the recording tape to
correspond to the variations in sound. Because there are magnetic
fields of various intensity virtually everywhere, that makes the
tape susceptible to loss of high frequencies and even of the entire
sound as it encounters magnetic fields. Even the playback head
itself can induce minute amounts of residual magnetism on to a tape
that over a period of time can reduce the high frequency content.Worse yet, in the 1970's many tape manufacturers changed their tape formulations and as that tape has sat on shelves over the decades it has developed what is called the "sticky tape syndrome." These tapes tend to shed oxide and to stick to the capstan and capstan roller when they are played. Baking them in a convection oven often stabilizes the tapes enough to enable one play before the condition returns. Ironically, I have some acetate based tapes from the late 40's and early 50's that still play without any problems. However, I have worked with tape masters from a leading Christian recording company where I spent most of my time replacing old splices that had dried out. In other cases, flaking oxide created drop outs. Still another consideration is the track configuration. Common track formats include full track mono, half track mono, half track stereo, quarter track stereo, four channel and multi-channel. In addition, many mastering studios in the 70's and 80's encoded their tapes with Dolby A converters. Finding a working Dolby A converter and someone experienced in setting it up can be daunting. To summarize: If you are going to transfer reel-to-reel tapes you need to have a machine that can handle the size of reel, width of tape and track configuration. CASSETTE RECORDERS BACK TO TOP OF PAGE Audio cassettes were popular in the 70's and 80's. Originally the Philips Company that invented the audio cassette intended that it only be used for voice applications such as dictation. Because of that, it was initially designed to record in mono. However by the 70's improvements in the mechanical design and consumer demand led to the development of stereo versions. Like tape recorders, cassette machines come as a package with all that you need included. Cassette recorders share similar concerns with tape recorders as far as 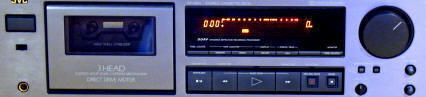 mechanical
construction is concerned. Most, but not all cassette recorders run
their tape at 1 7/8 ips and can record two channel stereo in two
directions. I have two Tascam cassette recorders that run at 3 3/4
ips. One records on four channels, the other on eight channels.
These are special units designed for mastering. mechanical
construction is concerned. Most, but not all cassette recorders run
their tape at 1 7/8 ips and can record two channel stereo in two
directions. I have two Tascam cassette recorders that run at 3 3/4
ips. One records on four channels, the other on eight channels.
These are special units designed for mastering.Many cassette recorders offered either Dolby B or C noise reduction or both. My Tascam units had an optional DBX noise reduction system as did a Teac consumer cassette deck that I owned. Essentially if you are going to transfer cassette tapes you need a reliable machine (preferably with solenoid operation) with noise reduction to match what was used on the cassette being transferred. MAKING ANALOG DIGITAL BACK TO TOP OF PAGE At some point, you have to convert the analog sound to digital and at a later point back to analog since our ears respond only to analog sound. This requires an analog to digital converter and a digital to analog converter. This is commonly referred to as an AD/DA converter. There are several ways to do this. If you are going to do your digital audio restoration using a computer, your computer may have a built-in sound card. If so, the AD/DA converter chips are a part of that sound card and you simply plug the output of your phono preamp, tape recorder or cassette deck into the input jacks on your computer's sound card. While the sound cards built in to computer motherboards have improved dramatically, it is often preferable to use an outboard sound card that you plug in to one of the slots on your computer motherboard or even a stand-a-lone sound card that you connect to a USB or Fire Wire input on your computer. These often provide better quality AD/DA chips and support a wider range of sampling and bit options. Digital audio recording is analogous to shooting a movie on film. A movie is a series of still photos taken over a period of time that are then shown at a rate of speed that tricks our brains into believing that it is seeing movement (24 frames per second). Similarly, digital audio recording samples the sound at a specific rate and tricks our ears into thinking that it is hearing a continuous sound. The rate that was agreed upon for audio CD's is 44,100 samples per second. But there are other sample rates -- some smaller and some larger. 48,000, 96,000 and 192,000 are common. The sample rate will determine the highest audio frequency that you can record. Essentially this is determined by dividing the sample rate by 2. So with a 44,100 sampling rate, the highest audio frequency will be 20,000 Hz. In addition, digital audio recording uses "bits" (zeroes and ones) to store data. The more bits, the more data that your digital audio tools will have to work with and the more likely that when the noise has been removed the audio will still sound like the original. CD audio uses 16 bits. An outboard AD/DA converter will be more likely to support additional bit rate options including 20 and 24 bit operation. If you are going to be using hardware based restoration equipment, the choice of an AD/DA converter may be more complicated. For example, the CEDAR Duo Declickle unit has no analog inputs or outputs. In order to interface an analog output (phono, tape or cassette) to the CEDAR unit, you will need a separate AD/DA converter. These are relatively pricey with entry level units starting at about $1,000. However, if you happen to have a DAT recorder, you can use the machine's built-in AD/DA converters for your interface. DIGITAL AUDIO EDITORS/HOSTS BACK TO TOP OF PAGE Once you have your analog sound in digital form, you have to record it in a digital format so that you can hear the sound and work on it. The format that is most commonly used to record digital audio is the WAV format. Other formats include mpg-3 and WMA. Both of those are "lossy" formats which means that they are compressed and some of the digital information is thrown away in order to compress the files. The most common means of making a digital audio recording is to use digital audio editing software. These are available for both MAC and Windows based computers. 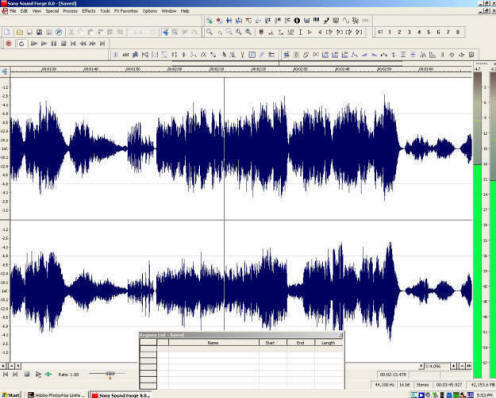 My
experience is with Windows, but the same basic principles apply.
Popular audio editing software include Adobe Audition and Sony Sound
Forge. Less well known is Tracer Technologies DC series. My
experience is with Windows, but the same basic principles apply.
Popular audio editing software include Adobe Audition and Sony Sound
Forge. Less well known is Tracer Technologies DC series.The standard procedure is to record the sound from your analog source using the record menu of your digital audio editing software. When the recording is finished, you save the file. In some audio editors you may have to re-open the file before you can work on it while in others the file is automatically opened on the editing screen. However, DC6/Live (and DC7) offer an alternative approach. Using the "Multi-Filter", you can chain together a series of digital audio noise removal tools and apply them to the sound as it is being recorded in the computer. You can actually hear the restored sound in real-time as your record, tape or cassette is playing and fine tune the various restoration tools as necessary. When you are done the file is automatically saved and can be opened for further tweaking. REMOVING IMPULSIVE NOISE BACK TO TOP OF PAGE There are two essential steps in digital audio restoration. The first is the removal of impulsive noise such as the pops and clicks that can be heard on a phonograph record. This can be accomplished by a stand-a-lone hardware unit such as CEDAR's Duo Declickle or by software plug-ins that are applied to the WAV file in an audio editor. While there are variations among different software designers as to how impulse filters remove the impulsive noise, there are three things that each one has to accomplish: 1. Detect the impulsive noise; 2. Remove the impulsive noise; and 3. Substitute a replacement WAV form for the noise that has been removed. Each impulse noise filter does this through specially designed algorithms. When you consider that on a record with badly degraded sound the impulse filter may have to remove more than a thousand clicks per second, this means that the impulsive filters are changing a LOT of the original sound. The goal is to remove only the noise and leave all of the original sound. But by their very nature impulse filters are adding something to the sound that wasn't there before. Most impulse filters analyze a portion of the WAV form immediately before or immediately after the impulsive disturbance and based on that analysis attempt to reconstruct what would have been where the impulsive noise is. Some algorithms also look at the opposite groove wall in the case of mono recordings being played with a stereo needle and if the other channel doesn't have a disturbance substitutes the WAV form from the other groove. No single impulse filter will remove all of the pops and clicks from a badly degraded recording. The wider the disturbance, the less likelihood that the filter will be successful. Part of the problem is that if you replace very wide disturbances you run the risk of introducing echo or jitter as you are replacing the disturbance with material that is essentially identical to that which is next to it. Because different software use different algorithms, my experience indicates that there is some value to using multiple impulse filters of different design. You have to be careful not to set an impulse filter too aggressively as it may remove the noise at the expense of altering or distorting the sound. You can apply the impulse filters one at a time or most audio editors will let you chain multiple plug-ins together and preview the result in real time and make adjustments prior to actually applying them. I provide detailed reviews of some impulse filters on other pages so I won't go into detail here on the differences between the various available impulse filters except to say that two stand out in my experience: 1. CEDAR's hardware Duo Declickle and  2.
T.C. Electronics' Descratch software plug-in. The CEDAR Duo
Declickle removes more noise than any software impulse filter that I
have used and it does so with fewer artifacts. The T.C. Electronics'
Descratch is the most effective impulse filter that I have used for
very large scratches. It even removes scratches left by the CEDAR
unit and it is able to do so without distorting the sound or adding
annoying echo or jitter. 2.
T.C. Electronics' Descratch software plug-in. The CEDAR Duo
Declickle removes more noise than any software impulse filter that I
have used and it does so with fewer artifacts. The T.C. Electronics'
Descratch is the most effective impulse filter that I have used for
very large scratches. It even removes scratches left by the CEDAR
unit and it is able to do so without distorting the sound or adding
annoying echo or jitter.REMOVING BROADBAND NOISE BACK TO TOP OF PAGE Once the impulsive noise has been removed, you are left with "broadband" noise. This is noise of a continuous nature such as the surface noise of a phonograph record or the hiss on a tape recording. Just as with impulsive noise there are hardware units and software plug-ins that can remove this kind of noise. There are differences in the specific approaches taken by various software companies in designing their broadband noise filters, but most work the same way. You first locate a sample of noise in your WAV file and take a "snapshot" of it. Based on that snapshot the broadband noise plug-in creates an FFT based filter that mirrors the noise. After that you preview the effect the plug-in will have on the WAV file and fine tune the threshold setting that determines at what amplitude the noise image will be applied and also the degree to which it will be applied, i.e.: How many dB of noise reduction you want to apply. In some cases there are additional controls that determine the size of the FFT window, the attack and release thresholds, etc. The problem is that in many cases the noise while continuous is not constant. So a noise print made at one point in the WAV file may not adequately remove the noise at another point. This can be compensated in part by raising the threshold level of the noise print. If the noise is essentially of the same character but just louder or softer at various points, this technique may provide good results. If not, you may have to divide your WAV file up into sections based on the differences in background noise and create and apply separate noise prints. Ironically, during loud passages, one needs less noise removal as the sound itself will mask most if not all of the noise and during soft passages you may need more noise removal because when the amplitude of the sound is low, you are more likely to hear the noise. I say "ironically" because there are less "bits" assigned to low amplitude areas of a WAV file than to the higher amplitude areas. Because of this, there is less information for the software to work with and it is more likely that some of the sound will be affected along with the noise. One way to increase the bits assigned to the low amplitude areas is to increase ALL of the available bits by recording at a higher bit rate. Many recommend recording at 24 bits rather than 16 bits for this reason. More recent versions of most digital audio editing software have added internal processing at the 24 bit rate or higher regardless of the bit rate at which you recorded the WAV file. This means that the actual processing is in fact done at a higher bit rate and then the 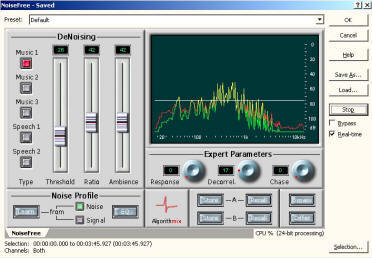 final
product is truncated back down to whatever bit rate the WAV file
actually is. final
product is truncated back down to whatever bit rate the WAV file
actually is.There are significant differences between various broadband filters. While most will perform well IF care is taken in creating the noise print and in setting the adjustments, I have found some superior to others. One that I particularly like is Algorithmix's NoiseFree. It is easy to use and provides a high degree of noise attenuation with minimal artifacts and makes it possible to retain a good degree of detail and ambience. However it is fairly pricey and I believe that the last time that I checked it was close to $3,000. FINE TUNING THE SOUND BACK TO TOP OF PAGE When you have applied the impulse and broadband noise filters, it is time to do a re-listen to the WAV file to find out what problems remain. If there is hum or if the mix doesn't sound quite right, you may need to apply equalization to deal with these problems. There are a whole host of equalization plug-ins that you can use for that. In addition to some experience applying eq, it also helps to have a good ear and a good mixing environment which includes full range monitor speakers. In addition to eq problems, there may still be noise remaining that the filters didn't remove. My practice is to use Adobe Audition's spectral view while listening to another run through of the sound file. With Audition's spectral view, you can actually see a disturbance in a frequency profile and Adobe provides superb tools from removing just the noise while leaving the original sound intact. I personally believe that this is one of the greatest contributions to digital audio to come along in many years and I recommend it very highly with the caveat that it takes patience, time and practice to become proficient at working in the spectral view. However it is time well spent and can save you many hours of work while also increasing the quality of your digital restoration. FINISHING UP BACK TO TOP OF PAGE At this point you are almost finished. There are a few odds and ends remaining. One is to add tracks to the sound file if it is going to be turned into an audio CD. Each audio editor has its own procedure for doing this. Once the tracks have been created, you probably will want to normalize each track so that the sound level will be consistent from one track to another. In some cases such as classical music you may not want to do that. Again, each audio editor has its own procedure for normalizing. If you are making an audio CD, there are various options for doing so. Most audio editors provide at least a rudimentary means of burning an audio CD. Some provide more options than others. I prefer to use Sony's CD Architect software version 5.2. It provides a plethora of options as well as the ability to ensure that the CD will be red book compliant. There are also options for labeling the CD. One way is to print directly on the surface of the CD using an inkjet or other printer designed for that purpose. Another is to use paper labels that include an adhesive back to stick the labels directly to the surface of the CD. One school of thought says that using paper labels is anathema and will result in premature failure of the CD and unbalanced CD's that may not play well. At one time I used an inkjet printer to print the label directly to the CD surface. However I found the process unacceptably slow and tedious as it could take five minutes or more to print a complicated CD label and I could only print one CD at a time requiring that a CD be inserted and removed for each label. In comparison, I could print numerous paper labels unattended in a relatively short period of time. Because of that I have reverted to using paper labels. I have been using them for ten years and have never had a CD fail because of a paper label nor any other problems associated with them. In the end, it is an individual decision. To create the labels there are various software label programs to accomplish that. My own personal preference is Sure Thing which is easy to use, produces attractive labels and has templates for virtually all of the current paper labels available. Sure Thing also provides templates for producing the front and back tray cards used in the hard plastic CD boxes. Other companies have similar programs. The very final step is to save both your original and processed files and archive them. Some institutions with large and rare audio collections are archiving their sound files on raid hard drive servers that save the files on multiple hard drives. If one hard drive fails, when it has been replaced the data can be reconstructed from the other hard drives. Others are archiving on data CDs or data DVDs. The problem here is that the life span of CD-R's and DVD-R's is uncertain. The one thing that IS certain is that their life span is limited. I have had audio CD-R's fail. Data CD's tend to do better at data recovery than audio CD's. DVD's are supposed to be a bit more stable than CD's. The best advice is that if you are going to archive on a CD-R or a DVD-R, plan on re-transferring your file about every five years to insure their integrity. If you are doing serious archiving, it is recommended that you maintain two sets of files for every audio source: 1. An original unprocessed file recorded at a minimum of 96 kHz sample rate and 24 bit depth and 2. The final processed WAV files. The reasoning behind the first requirement is that digital audio restoration tools are continuously improving. Five or ten years from now you may want to re-restore sound that you have previously restored. The problem is that once you have applied impulse and broadband noise filters to an audio file, it is unlikely that reapplying new impulse and noise filters will have the desired effect. In addition, you may find that what sounded good by today's standards may not by tomorrow's. In such a case you want to be able to start all over with the original unprocessed files. As to the second requirement, if your master audio CD fails, you will probably be able to produce a new master if you have a data CD or DVD or the processed files including the ancillary CD control files. In addition, if you are archiving rare sound material it is important that you preserve the original audio source as long a it remains playable. Pressed vinyl records, for example, may well have a life span exceeding 200 years. Archivists and restorationists in future generations will call you blessed if you leave them copies of the original first generation sound material.
|
